WiX Toolset is an open-source project, developed by Microsoft and it is being maintained by Rob Mensching . It provides you a set of tools to create Windows Installer Packages from XML Source Code. Most of the companies are building Sass products but still there are some of them building on-premise products.
These products should be packaged into an installer or exe to be installed on an respective machine. Since we have now WiX it can be done at ease. It provides you both a command line environment or you can use tools such as Visual Studio to build WiX applications.
In this blog, we are going to see some important terms to be known WiX and also we shall how we can create an WiX project using Visual Studio 2019.
Important Terms
Candle
Candle.exe will compile all your wix source files(.wxs) into wix object files(.wix). You can use candle.exe in command line such as,
"%WIX%bin\candle" Product.wxsThe above command will convert Product.wxs to Product.wixobj.
Light
Light.exe is responsible for collecting all the .wixobj files and also for retrieving metadata from all the files and generating the final installer.
light.exe [-?] [-b bindPath] [-nologo]
[-out outputFile] objectFile [objectFile ...] [@responseFile]
Lit
Lit.exe is responsibe for creating a WiX library by combing the source files.
lit.exe [-?] [-nologo] [-out libraryFile] objectFile [objectFile ...] [@responseFile]Dark
Dark.exe converts the Windows Installer database into a set of WiX source files. It will be very useful for authorizing the data.
Heat
Heat.exe is used for harvesting your files. It will combine files from one .wxs file to other .wxs files if they are dependent on each other.
And finally it will generate components based on that and will provide you an finally it will generate Windows Installer XML Source Files.
Pyro
Pyro.exe helps you to create patch files(.msp) with the help of XML output patch file (.wixmsp) and one or more XML transform files (.wixmst).
Burn
Burn is an bootstrapper component which will be helpful to create your own packages with your respective UI.
These are some of the terms that are mostly used in WiX. Next we will see how we can create an Setup Project in Visual Studio 2019.
How To Create WiX Setup Project using Visual Studio 2019
Prerequisite
If you don’t have Visual Studio 2019, download using this link. Go for Community Edition, because it’s free.
Download WiX Toolset from this link.
And also you need to WiX Toolset extension for Visual Studio 2019 which can be downloaded in this link.
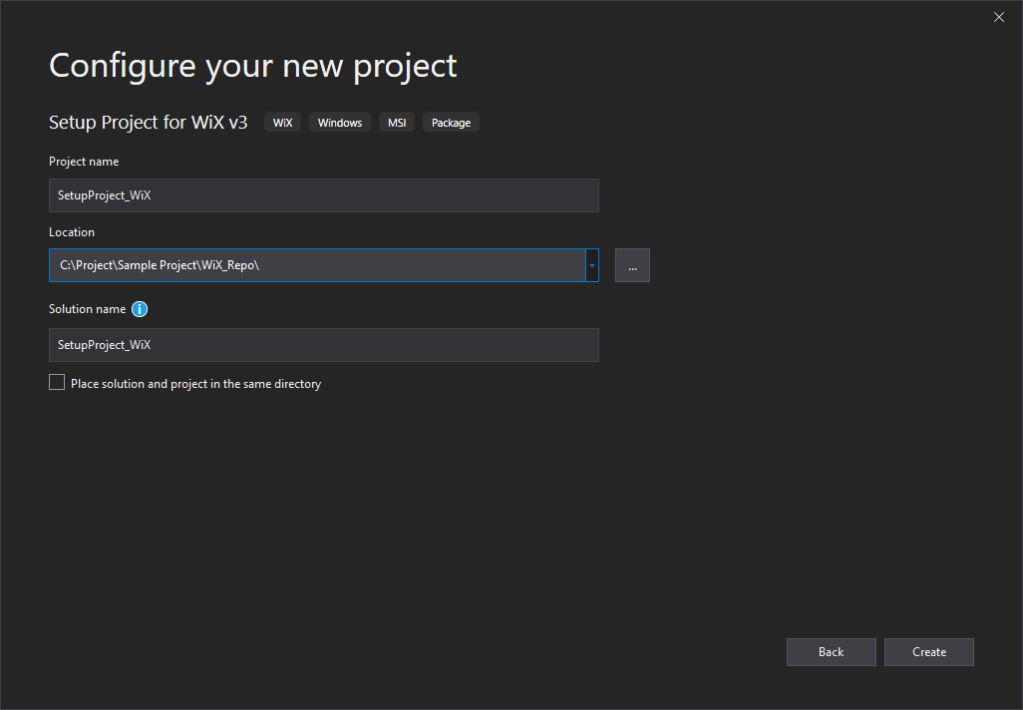
Step 1:
Open Visual Studio 2019 and click Create a New Project and it will provide you some list of project templates. Search for WiX and please select Setup Project for WiX v3 and click Next.

Step 2:
Mention the project name and the directory of your solution and click Create.
Step 3:
Once the project is created, there will be a file generated called Product.wxs file. This is the major file of your WiX Setup Project. Please mention the Manufacturer name in the Product attribute.
<Product
Id="*"
Name="SetupProject_WiX"
Language="1033"
Version="1.0.0.0"
Manufacturer="NullableReference"
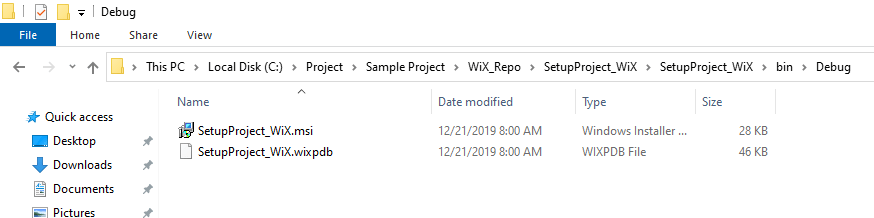
UpgradeCode="7865498f-41a5-4f56-ade8-57244283500b">Once you build the solution you’ll be able to find the .msi package in the respective bin\debug folder.
If you run this package it’ll just get installed and you’ll be able to find the respective package in the uninstall or remove programs which is available in Control Panel.
Code Explanation
Product
In the product attribute you need to mention the Id, Name, Langugae, Version, Manufacturer and the UpgradeCode. These are mandatory.
And if you want to maintain upgrades you can also include ProductCode.
<Product
    Id="*"
    Name="SetupProject_WiX"
    Language="1033"
    Version="1.0.0.0"
    Manufacturer="NullableReference"
    UpgradeCode="7865498f-41a5-4f56-ade8-57244283500b">
....
...
</Product>
Feature
In the feature attribute, you should mention the Id, Title and Level. Basically feature consists of ComponentGroupRef or just Components.
<Product
    Id="*"
    Name="SetupProject_WiX"
    Language="1033"
    Version="1.0.0.0"
    Manufacturer="NullableReference"
    UpgradeCode="7865498f-41a5-4f56-ade8-57244283500b">
   <Feature
      Id="ProductFeature"
      Title="SetupProject_WiX"
      Level="1">
		<ComponentGroupRef Id="ProductComponents" />
                <Component Id = "TestComponent" />
   </Feature>
</Product>
In your project you will have several component groups or just components and each component group or component should be mapped to a feature.
In the above example we have mapped ProductComponents component group with ProductFeature.
Component Group
ComponentGroup is an collection of Components. For this attribute you should mention the Id and the Directory.
<ComponentGroup Id="ProductComponents" Directory="INSTALLFOLDER">
	<Component Id="ProductComponent">
	</Component>
</ComponentGroup>
Fragment
A fragment consists of ComponetGroups or it can also consist of some Directory logics in the respective code snippet.
<Fragment>
   <ComponentGroup>
        .. .. . . . . . . .  .
   </ComponentGroup>
</Fragment>
Conclusion
I have been using WiX since a year and it provides you some good insight on creating these MSI packages. And also there aren’t enough articles about WiX, so understand the basics right such that you won’t find any critical issues in the future.
To get more idea on WiX, visit this link.
In our next blog we will explore about REST and gRPC.
Happy Coding!
Cheers! 🙂

Leave a comment