
Dependency Injection(DI) is a software design pattern which decreases the tight-coupling between the software components. If you take any projects, couple or more classes combine together to make a business logic and this leads to dependency of each other.
To solve this dependency in an efficient way we have DI. Most of the .NET applications uses Dependency Injection because,
- It avoids duplication of code.
- It makes the software components loosely-coupled
- It will increase your productivity.
To achieve dependency in our .NET applications, we have an NuGet Package called Autofac. The main priniciple of Autofac is,
Initialize services with me only once,
I’ll give it you whenever you need
There are lot of ways in which dependency injection can be done such as,
- Constructor Injection
- Setter Injection
- Service Locator Injection
- Interface-based Injection
In this blog, we will see how we can achieve Dependency Injection with Autofac in our .NET application.
Autofac with Visual Studio 2019
If you don’t have Visual Studio 2019, download using this link. Go for Community Edition, because it’s free.
Step 1:
Open Visual Studio 2019 and click Create a New Project and it will provide you some list of project templates. Please select Console App(.NET Framework) and Click Next.

Step 2:
Mention the project name and the directory of your solution and click Create.

Step 3:
A console app will be created and first we are going the install the Autofac package for your project. So Right-click on your project and select Manage NuGet Packages.
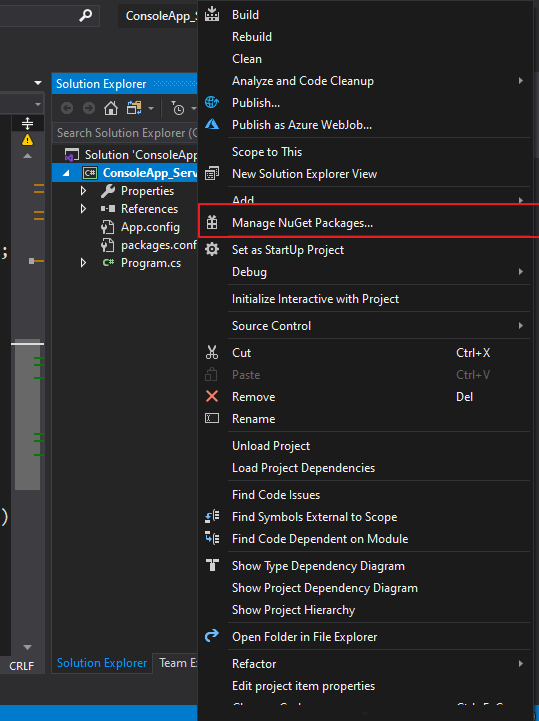
And search for Autofac and select the respective package and click install.

Step 4:
In this example, we are going to inject our custom logger. Let’s say you have some custom logging class like,
LogProvider.cs
public class LogProvider : ILogger
{
   public void GetCurrentClassLogger(string logStream)
   {
       Console.WriteLine("logStream");
   }
}
ILogger.cs
public interface ILogger
{
   void GetCurrentClassLogger();
}
Instead of doing,
var logger = new LogProvider();
logger.GetCurrentClassLogger();
You can inject this service in your respective constructors and you shall get the logger instance.
Step 5:
Next step we are going to build BuildContainer.
Program.cs
static IContainer BuildContainer()
{
   var builder = new ContainerBuilder();

   //Registering LoggerInstance
   builder.RegisterType<LogProvider>().As<ILogger>();
   return builder.Build();
}
We have succesfully registered the Logger instance.
Step 6:
Just resolve the dependency in the main class, and you can do all the functionalities available in the logger class.
Program.cs
static IContainer Container { get; set; }

static void Main(string[] args)
{
   Container = BuildContainer();

   //Resolve the dependency and use it
   var log = Container.Resolve<LogProvider>();
   log.GetCurrentClassLogger();
}
You can think, like should I have to initialize these container whenever I want to resolve it. Absolutely not, since it’s an console app I’m doing it.
Source code link => https://github.com/SuhasParameshwara/DependencyInjection_Demo
Dependency Injection in API’s
We almost everyone build API’s and most of us will have the service layer and the repository layer. And there will be around 8 to 10 services with,
public class DemoController : BaseApiController
{
   private readOnly IServiceA serviceA;
   private readOnly IServiceB serviceB;
   private readOnly IServiceZ serviceZ;
   public DemoController()
   {
       serviceA = new ServiceA();
       serviceB = new ServiceB();
       serviceC = new ServiceC();
       . . . . . . . . .
       . . . . . . . .
       serviceZ = new ServiceZ();
   }
}
So as you see there are lot of new’s used and if you use many controller’s you will create lot of instances of this 0_o.
Rather,
- Create instance just only once
- Use it everywhere
In our API layer we have Startup.cs, you can register the dependency injection in that respective file.
Startup.cs
public class Startup
{
   public void Configuration(IAppBuilder app)
   {
	var builder = new ContainerBuilder();
	var container = DependencyInjection.Configure(builder);
        app.UseAutofacMiddleware(container);
    }
}
DependencyInjection.cs
public static class DependencyInjection
{
   public static IContainer Configure(ContainerBuilder builder)
   {
	RegisterServices(builder);
        var container = builder.Build();
        return container;
    }
    public static void RegisterServices(ContainerBuilder builder)
    {
      builder.RegisterType<ServiceA>().As<IServiceA>();
      builder.RegisterType<ServiceB>().As<IServiceB>();
      builder.RegisterType<ServiceC>().As<IServiceC>();
      .	. . . . . .  . . . .
      . . . . . . . . . . .
      builder.RegisterType<ServiceZ>().As<IServiceZ>();
     }
}
In the above file you can see we have registered all the services in the startup, and now if the API starts it will hit the respective controllers and using dependency constructor injection you should be able to get all these services.
public class DemoController : BaseApiController
{
   private readOnly IServiceA _serviceA;
   private readOnly IServiceB _serviceB;
   public DemoController(IServiceA serviceA, IServiceB serviceB)
   {
       _serviceA = serviceA
       _serviceB = serviceB();
       . . . . . . . . . . .
       . . . . . . . . . . .
   }
}
And also you can make use of this in any other controllers you want and you can avoid creating multiple instances across multiple controllers.
Conclusion
As you see, we have avoid creating multiple instances of the same class and you’ll be able to see the real power of Dependency injection when you use it in large enterprise application.
It will definitely improve the performance of your application since it avoids lot of duplication of code. This package can be used in .NET Framework as well as .NET Core.
In our next blog, we will explore about an another useful .NET Library called Dapper.
Happy Coding!
Cheers! 🙂

Leave a comment